Friday, December 09, 2016

Merry Christmas


I made some Christmas cards for the team!
I think they all have them now so I can share! lol

I had fun working in blue and white and I just love the snowy acetate
behind all my die cuts! 


Are you all excited? Christmas is not far away now!!! .
My girls are getting very excited lol! 

Happy Crafting! 


Wednesday, December 07, 2016

Thank you!


I made a quick Thank You card this week for Heartfelt Creations.
It's always good to send thank you's especially after Christmas!

The card opens so the inner of the card is the green part of the card,
the front is shorter than the back to add dimension to it!
I couldn't get a good pic tho sorry! 

Are you ready for Christmas? Lol I'm still making Christmas cards!
Pressies are all bought I just need to wrap them........ 
Eek it's not long now! 
There is a lot of excitement here in our house!

Have fun!

Here is what I used to make my card:

HCDP1-263 Sunrise Lily Paper Pad
HCD1-7113 Blushing Rose Stem Die
HCPC-3755 Blushing Rose Stem Cling Stamp
HCPC-3474 Heartfelt Expressions Cling Stamp
HCD1-7120 Fleur border Basics Die
TSMP800 Memento Rich Cocoa ink pad
TSMP900 Memento Tuxedo Black ink pad
159723 Art Institute Dries Clear glue

Other Products Used : White card, Peeled Paint and Victorian Velvet Distress 
inks and Distress pens, gems, 3D foam pads.

Cut a side fold card 5 1/2" x 4 1/4". From the paper pad cut a piece of paper 
5 1/2" x 4 1/4" and adhere to the inner of the card. Using the border die, 
cut the front of the card. Stamp the sentiment in the left corner. Stamp, 
cut and colour the rose. Adhere the rose with 3D foam pads, ink the edges of the
inner of the card and add the gems to the front of the card. Your project is now complete.

Wednesday, November 30, 2016

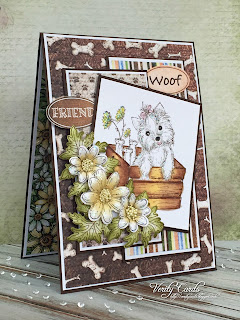
For a friend!


It's Wednesday and here is my card this week for Heartfelt Creations!
Can you tell I LOVE this image!! Lol project no:3 with it!! 
Well I do have a Westie and I can't resist!!! lol!!!

It's been ages since I did some colouring......... 
I thought I had better get on and do some lol!!! 

Make sure you stop by the Heartfelt Creations blog
there are as always amazing projects for you! 
Click HERE to go to the blog. 


To make my card I used the following: 
HCST1-401 Flower Shaping Kit
HCDP1-272 Pampered Pooch Paper Pad
HCPC-3761 - You're Paw-fect
HCPC-3656 Delightful Daisies Cling Stamp
HCD1-760 Delightful Daisy Die
ANC850 Spring Bling Prills (Lemon Chiffon)
TSMP800 Mement Rich Cocoa ink pad
159723 Art Institute Dries Clear glue

Other Products Used : Brown and White card, Spectrum Noir Illustrator Pens Pink Lace,
True Black, Soft Brown, Daffodil, Blender, Muted Brown, Pearl Blue, Ice Grey2,
Earth Brown and Ivory

Create a 7" x 5" tent fold card using the brown card. Cut a piece of white card 
4 14/16" x 6 14/16". Cut a piece of paper from the pad 4 3/4" x 6 3/4" and adhere 
them to the card. Cut two pieces of brown card, one 2 3/4" x 5" and one 5 3/4" x 2 10/16".
Cut two pieces of white card 2/16" smaller on each side to layer on the brown card and then
again with the papers from the paper pad. Adhere the layers and adhere to the card. Stamp and 
colour the image and cut 3 5/16" x 3 3/4" Cut a piece of brown card 3 1/2" x 3 14/16", layer
and adhere the image to your card. Cut two sentiments from the paper pad and adhere to the card.
Stamp, cut, colour and shape the flowers and leaves. Adhere prills into the centre of your flowers
and glitter the petals. Cut another piece of white card 6 14/16" x 4 14/16" and adhere to the inner
of the card. Cut a piece of paper 4 3/4" x 6 3/4" and adhere to the inner of your card. Your project
is now complete.

Wednesday, November 23, 2016

Black Friday Blog Hop peek!


 EEK so we are all so excited to be doing a blog hop here at Heartfelt Creations!
Hope you have had fun seeing all the sneak peeks of our projects for 
Friday with all the new goodies we have for you!
You will have come from Sandy's blog, but if you get lost at any point along the way
we have a list of all the ladies in our hop at the bottom of the post!
Make sure you stop by them all and leave a comment!

I had so much fun making my card this week! From the front it looks like
a card BUT when you start to open it behind each layer are
journal pieces to add little messages or pictures! 
It become so much more than a card! 
Keep reading there are lots of pics of each of the inner layers! 

Here is my card stood up, I love these foldout cards they add such dimension!


I am the penultimate blog in the blog hop, the next blog is LORI
We hope you have enjoyed seeing what we have on Friday for you!
Remember to comment you could win a full set of the Fold out cards and Dies!


You have until 11.59pm on the 28th November to join in.
The prize contains the following:
1x Delicate Border Basic Die
1 x Classic Border Basics Die
1 x Fleur Border Basics Die
1 x Elegant Border Basics Die
1 x pack of 4 1 1/4" x 5 1/2" Foldout cards Black
1 x pack of 4 1 1/4" x 5 1/2" Foldout cards White
1 x pack of 4 1 1/4" x 5 1/2" Foldout cards Kraft
1 x pack of 5" x 7" Foldout cards Black
1 x pack of 5" x 7" Foldout cards White
1 x pack of 5" x 7" Foldout cards Kraft
1 x pack of 6" x 6" Foldout cards Black
1 x pack of 6" x 6" Foldout cards White
1 x pack of 6" x 6" Foldout cards Kraft

A winner will be announced on the Heartfelt Creations Blog and Facebook on 30th November.


The winner will need to email info@heartfeltcreations.us to claim their prize.
A full list of the blog hop can be found at the bottom of the post.


To check out more about the Black Friday releases
 and the savings we have for you CLICK HERE

To make the card I used the following

HCST1-401 Flower Shaping Kit
HCDP1-250 Birds and Bloom Paper Pad
HCD1-756 Birds and Bloom Die
HCPC-3644 Birds and Blooms Cling Stamp set
HCPC-3673 Heartfelt Sentiments Cling Stamp set
HCCF1-444-2 5"x 7" Fold Out Cards White
HCD1-7120 Fleur Border Basics
TSMP900 Memento Tuxedo Black
TSMP800 Memento Rich Cocoa ink
159723 Art Institute Glue

Other Products: White card, glitter glue, gems Distress inks - Broken China, Antique 
Linen and Peeled Paint

Using white card cut the borders and adhere to the card. It doesn't matter which 
side you glue it to we are going to cover both sides of the card. Cut out papers
to adhere to all sides of the card and a card front for the inner back to write on.
Create pockets on the backs of the folds, fussy cut from the paper pad the birds and flowers
to create a top to the pocket. Glitter and cut small journal panels
from the paper pad, glitter those as well and then put into the pockets. Stamp, colour and shape
the birds and branches. Adhere gems to the flowers and glitter then adhere to the card fronts.
Fussy cut the bird bath and fence, adhere to the card and glitter. Cut a 5" x 7" piece of paper
and adhere to the back of the card. Cut a piece to make a pocket and glitter. Cut three
journal pieces and glitter. Put them into the back pocket and  your project is complete.

Full blog hop list:

And me you are here!
Lori Williams

Wednesday, November 16, 2016

Happy Birthday!


Yay it's Wednesday again! Here is the card I made to go with my bag last week
for Heartfelt Creations with the Pampered Pooch collection!

HCST1-401 Flower Shaping Kit
HCDP1-272 Pampered Pooch Paper Pad
HCPC-3760 Paw-fect Pooches Cling Stamp
HCD1-7116 Paw-fect Pooches Die
HCPC-3656 Delightful Daisies Cling Stamp
HCD1-760 Delightful Daisy Die
ANC850 Spring Bling Prills (Lemon Chiffon)
TSMP800 Memento Rich Cocoa ink pad
159723 Art Institute Dries Clear glue

Other Products Used : White card Glitter glue, Scattered Straw, Tea Dye and Peeled Paint Distress inks, 
3D foam pads, Kraft Knife

Create a 6" x 6" tent card with the white card. Cut a 6" x 6" paper panel from the paper pad
and adhere to the inner of the card. Glitter the flowers. Cut a card front from the paper pad
and cut the centre image and out square. Adhere the three parts of the card front to the card
so that each level is a different height. The fist adhere to the card and then the next use one 
layer of 3D foam pads, The image adhere with 2 layers of foam pads. Glitter the image, flowers
and edges of each layer. Stamp, cut ,colour and shape the flowers and leaves. Adhere prills
to the flower centres and glitter the petals. Cut a sentiment tag from the paper pad and 
adhere to the card with the leaves and flowers. Stamp, cut and colour the bone and stamp the 
sentiment in the centre. Adhere to the card and your project is complete.

Wednesday, November 09, 2016

Pampered Pooch Bag

Oh my goodness it's here!!!! The Pampered Pooch collection!!!
We have been so excited for this release!

I just had to use this image as it reminds me of my own pampered pooch!
I have been wanting to make a bag like this for ages and this was the perfect 
opportunity to make it! lol! I imagined a little pooch in it!!! 
Of course I had to make a card to go with it which I will share next week!


Here is the back..... I created a little pocket with the border die!

Make sure you stop by the blog and check out the projects
they are AWESOME!!!! 

Heartfelt Creations

To make this bag I used the following:

HCST1-401 Flower Shaping Kit
HCDP1-272 Pampered Pooch Paper Pad
HCPC-3760 Paw-fect Pooches Cling Stamp
HCD1-7116 Paw-fect Pooches Die
HCPC-3656 Delightful Daisies Cling Stamp
HCD1-760 Delightful Daisy Die
ANC850 Spring Bling Prills (Lemon Chiffon)
HCD1-783 Border Essentials Die
TSMP800 Mement Rich Cocoa ink pad
159723 Art Institute Dries Clear glue

Other Products Used : Tool Edger, Spellbinders Grand and Large Circles, Glitter glue,
White and brown pen, Scattered Straw and Peeled Paint Distress inks, 3D foam pads.

Cut two pieces of contrasting paper together at the same time using the largest of the
Spellbinders Grand Circle dies and adhere them together. Repeat this step so you have two
circles with your chosen papers on the outer. Cut the base off the circles so that they
are 5 1/2" tall at the tallest point. Draw a faux stitching line around the outer edges
in brown ink. Glitter the paws with glitter glue. Using two dies together one from the 
Grand Ovals and one from the large circle dies cut two pieces of brown paper from the pad 
together to form the handle and adhere them together, drawing faux stitching in white pen 
along the outer edge. Repeat this again for a second handle. Adhere to the outer of each 
of the sides of the bag.

To make the box in the centre cut a piece of paper from the pad that co-ordinates with the 
inside of the bag 11 3/4" x 8 3/4". Score 3" on all sides and then cut each corner piece
to form a tab. Fold and adhere together to form a box. Adhere the two sides of the bag to
the box.

For the front of the bag cut three pieces of different papers from the paper pad. 
2 pieces at 4 1/4" x 4 1/4" and one at 3 3/4" x 4 1/2". Distress all the edges with the 
edger tool and glitter. Cut the centre of one of the card panels and distress the edges
and glitter the edges and the image. Using 3D foam pads layer the make and three pieces
of paper and adhere to the bag. Stamp, colour, cut and shape the flowers and leaves.
Add prills the the flower centres and glitter the petals. Adhere to the card with a tag
sentiment cut from the paper pad. Stamp, cut and colour the bone and stamp the sentiment
in the middle. Adhere to the bag and glitter.

For the back of the bag create a pocket by cutting the picket fence border die in
the dark brown paper from the pad. Cut a piece of paper 2 1/2" x 8 " and adhere
the picket fence die cut to the paper. Put glue on the edges of the bag where the pocket
will be and place the paper over the side of the bag. Trim the excess away and draw the 
faux stiching. Cut a tag and sentiment from the paper pad and adhere with flowers to 
the bag handle. Adhere flowers and leaves to the pocket and the bag is complete.
Just add a gift and a note in the pocket!

Happy crafting everyone! 

Wednesday, November 02, 2016

Thinking About You


Yay it's that time of week again when I get to share my card
with you for Heartfelt Creations! I am just loving theses roses! 
I must make some in lilacs and purples tho!!!!! Lol!!!

This week I used the card fronts from the paper pad.
They do make very quick and easy cards!

We are so excited for next week! It's the Pampered Pooch release!!!
Eeekkkkkkkkkkkkk it's one you have been waiting for!
See a preview of the collection HERE


To make the card I Used the following:

HCST1-401 Flower Shaping Kit
HCD1-7110 Classic Rose Die
HCD1-7111 Classic Vines Die
HCPC-3752 Classic Rose Cling Stamp
HCPC-3753 Classic Rose Vines Cling Stamp
HCDP1-270 Classic Rose Paper Pad
HCPC-3474 Heartfelt Expressions Cling Stamp
TSMP900 Memento Tuxedo Black ink pad
TSMP800 Mement Rich Cocoa ink pad
159723 Art Institute Dries Clear glue

Other Products Used : White card, glitter glue, 3D foam pads, Peeled Paint 
and Victorian Velvet Distress Ink.

Watch this video HERE to see how to create the Classic Rose flower.

Using white card make a 6" x 6" tent fold card. Adhere a card front to the front of the card.
Cut the centre from another card front. Stamp the sentiment on it and using 3D foam pads 
adhere to the card. Glitter the edges and flowers. Cut a 6" x 6" paper panel from the pad and
adhere to the inner of the card, glitter the flowers. Stamp, cut, colour and shape the roses
and leaves and adhere to the card. Glitter the roses and your card is complete.

Wednesday, October 26, 2016

Save the date!


It's Heartfelt Wednesday! I have a card to share today!
I didn't know where I was going with this card at all! lol
I started using the Rose Swirls and roses and it just went from there!

I love using the emboss resist technique as used on the flowers here,
it gives such a lovely effect!

Wouldn't this make lovely wedding stationery?

Make sure you take a look at the Heartfelt blog there are
some amazing projects!

Sorry I have been missing again, my daughter had a week in hospital
and it's taken so long just to catch up with everything! 

Here is what I used to make my card:

HCST1-401 Flower Shaping Kit
HCD1-7110 Classic Rose die
HCPC-3752 Classic Rose stamp set
HCPC-3756 Blushing Rose Swirls Cling stamp set
HCD1-7114 Blushing Rose Swirls die
HCPC-3707 All Glammed up sentiments
CB80 White ColorBox Ink pad
71006 Rose Coral ColorBox chalk ink
TSMP707 Memento Bamboo Leaves ink pad
RPEJ685 White Embossing Powder


Other Products Used : White card, pink paper, Spellbinder Intertwined Spirals and
Grand circles dies, gems, 3D foam pads, glitter glue, glue and brown ink.

Using a piece of white folded card die cut a card with the outer die from the Spellbinders
dies. Die cut a single cut in pink paper and adhere to the card front. Die cut the swirls
and adhere with 3D foam pads to the card. Die cut a circle die and colour the edges with
green ink adhering it to the card with 3D foam. Stamp the sentiment and die cut with
 the circle die from the Intertwined Spirals set, ink around the edges and adhere to
the card with 3D foam. Stamp, colour and shape the flowers and swirls and adhere to
your card. Glitter the circle edges and the flowers and ad gems and your card is complete.

Happy crafting! 

Wednesday, October 05, 2016

Roses to say Thank you.


It's Heartfelt Wednesday again! YAY!
This week I tried something new.....
I got all inky and had a go at creating fabulous backgrounds on my card!
I know..... but it's something I haven't tried before!
Lol I LOVED it!!!! 
Hehe I did have blue fingers though for a few days!!!!!! 

Make sure you stop by the Heartfelt Creations blog and see the fabulous projects HERE

Oh and there is a sneaky peek at the next collection too click on the pic for this!


To make my card I used the following:

HCST1-401 Flower Shaping Kit
HCD1-7112 Classic Rose Bouquet die
HCPC-3754 Classic Rose Bouquet stamp set
HCPC-3611 Arianna Bird Haven Cling stamp set
TSMP900 Memento Tuxedo Black ink pad
TSMP800 Mement Rich Cocoa ink pad
241159 Dove Blender Kit


Other Products Used : White card, glue, glitter glue, 3D foam pads, Peeled Paint 
Broken China and Barn Door Distress Ink, water spray, acrylic block and 3D foam pads.

Using a finger dauber apply Broken China ink to the acrylic block. Spray lightly
with water and place the front of a white tent card over the ink. Dry with a heat
gun and repeat until you are happy with the look on your card. Stamp the sentiment.
Stamp in brown the rose and colour with the Dove Blender pen and ink pads. Glitter
the roses and using 3D foam tape adhere to your card. Your project is now complete.

Happy crafting!

Saturday, October 01, 2016

A Window Card


Happy World Card Making Day!
I wanted to make a card to say thank you
to you all for being here with me,  it means so much.
Thank you !!!!!

You know when you have a crafty idea and you JUST have to make it?
Lol well this is one of mine!
I used the Botanic Window die from Heartfelt Creations to make a card!
It was really quick and easy to make, it took 30 mins from start to finish!

After I had made my card I began to think..... dangerous I know! lol!
These would make awesome wedding stationary!

Have lots of crafty fun, I'm going out for dinner tonight
and can't wait! YUM TGI Fridays here we come!!!!
Lol I know exactly what I want too!!!
Our nearest TGI's is 40 miles away so we don't go unless we are in the USA!


Wednesday, September 28, 2016

You are in our thoughts and prayers


Yay it's Heartfelt Wednesday! Here is my card this week I made using 

These stamps were so easy an fun to colour! 
I used ink pads and my Dove Blender pen.

Wow the year is going by fast, it's nearly October! 
How did that happen I must have blinked! lol!

Hope you are all having lots of crafty fun!

To make the card I used the following:

HCST1-401 Flower Shaping Kit
HCD1-7112 Classic Rose Bouquet die
HCD1-7111 Classic Rose Vines Die
HCPC-3754 Classic Rose Bouquet stamp set
HCPC-3753 Classic Rose Vines Cling Stamp
HCDP1-270 Classic Rose Paper Pad
TSMP400 Memento Ink -Rose Bud
241159 Dove Blender Kit


Other Products Used : White card, glue, glitter glue, 3D foam pads, Peeled Paint 
Distress Ink, Spellbinders Labels 47 Decorative Die and pearl gems.

Using white card die cut two of the Spellbinder dies. Adhere together along the top
carefully with glue to create a card. Cut a piece of white card 3 1/2" x 3 2/16" 
and adhere to the front of the card. Stamp the images, colour using the ink pads
and the Dove Blender pen and die cut. Glitter the flowers. Adhere to the card
with 3D foam pads. Cut a sentiment from the paper pad, curl, glitter the edges
and adhere to the card. Adhere pearls to the card front and your project is complete.

Tuesday, September 27, 2016

Let's Blog Hop!


Today I am blog hopping with the Alumni Team at Heartfelt Creations.
I thought I would join in the fun and hop along with them!

If you are hopping you should have come from Mary's blog
Please leave a comment below and you could win a $25 Heartfelt Creations gift certificate!
The Hop starts 8am EST on Tues. September 27th and closes Fri. 30th September at 11.59pm EST.
The Winner will be posted on the Heartfelt Creations Facebook page on Saturday 1st Oct!
The next blog in our hop is Sarah Miller  we all hope you had great 
fun hopping and good luck for the prize draw! 


For my card I have used the Classic Roses....... ooh I had great fun
making them. I coloured them with Antique Linen and Victorian Velvet
Distress Inks. Oh and I just had to glitter them too!!!! lol! 

Oh and yes I used my Labels 54 Decorative Element & Labels 54 die again! Lol!
I will give it a rest now for a little while at least!!!

Here is a list of the full blog hop just incase you haven't hopped yet!


Have fun crafting everyone!


Monday, September 26, 2016

Thank you.


Thought I'd do a quick post and share these 
Thank you cards I made yesterday! 

I had lots of inky fun colouring the card!
As I was making them I thought that this stamp and die  
would make great coffee morning invites!
Just change the sentiment!

I used the Heartfelt Creations Coffee Talk collection to make the card,

Yesterday was one of those days I didn't expect to craft on!
You know those days where your plans dramatically change in an instant?
Lol that was us! Still there is always a silver lining! 

Make sure you stop by tomorrow I am hopping 
with my friends in the Heartfelt Creations Alumni team! 
The hope starts at 8am EST (1pm UK time!)

Have lots of crafty fun!

Sunday, September 25, 2016

Thank you so much!


I thought I would share another card I made with the 
Heartfelt Creations Birds and Blooms collection
and the Spellbinders Labels 54 Decorative Elements die!

Not sure who this one is going to just yet ......
but those birdies will be flying off soon I am sure! lol!

I am having fun using this die as a card base!
You will be seeing it again for sure! lol! 

Happy Crafting Everyone!


Friday, September 23, 2016

Birthday Flowers


Here is a card I made for Crafter's Companion!
I really am loving making shaped cards at the moment!
This design would make a great wedding card too all you would need 
to do is change the sentiment! 

Lol I used papers behind the diecut front and in side the card, I guess
I could have used Kraft card tho as it gives the same effect!
I do so love Pink, white and kraft as a colour combo! 

Have lots of crafty fun!

To make the card I used:

Dies'ire Cut In Create-a-Card - Floral Garden die
Sara Signature English Country Garden - Lazy Daisy Die
Sara Signature English Country Garden - Floral Duo die

Other items: Gems, pearls, Distress Inks, glitter glue


Wednesday, September 21, 2016

Hats off!


For my card this week for Heartfelt Creations I was inspired
by London Fashion week! 

I just love hats, how I wish they would become popular again! 
Some of the vintage hats from the 1920's are amazing! 

Oh the colours of the Classic Rose Collection......
I had a hard time deciding what colour to make this! 
The papers are all so pretty! 
I am always drawn to purples they remind me of my Grandma,
She would have loved this! Infact she wold have had
me decorating a real hat for her with these!!!! Bess her.


Have you stopped by the Heartfelt Blog? 
Oh my there are some stunning projects! 
You can see them HERE

To make the card I used the following:
HCST1-401 Flower Shaping Kit
HCD1-7111 Classic Rose Vines Die
HCD1-7110 Classic Rose Die
HCPC-3753 Classic Rose Vines Cling Stamp
HCPC-3752 Classic Rose Cling Stamp
HCDP1-270 Classic Rose Paper Pad


Other Products Used : White card, glue, glitter glue, 3D foam pads, Peeled Paint and Dusty Cncord
Distress Inks, String pearl gems, Hat pins.

Watch this video HERE to see how to shape the Classic Rose flowers.

Using white card create a hat card using the template HERE
I enlarged the template to create a larger hat by printing it at a larger scale. 
Draw around the template on paper from the paper pad and adhere to the inner of the card.
Repeat for the front of the card. I used a piece where the base of the hat looked different
to the top. Adhere to the card front and ink the inner and front edges of the hat. Cut a strip
of the darker paper from the pad 1" x 4 1/4" and adhere to the card as the hat band with 3D foam.
Cut a strip of paper 7/16" x 4/1/4" and adhere to the top of the darker strip. Glitter the patterns
on the paper for the hat front and adhere pearl string along the hat band. Stamp, cut, colour and
shape the leaves and the flowers. Glitter the flower petals. Adhere the leaves and flowers to the card
and your project is complete.

Happy Crafting! 

Sunday, September 18, 2016

On Your Special Day


Yay as promised here is my card I made for my Aunt & Uncle's anniversary!
Yes it's pink! lol!!!!! 

I just fell in love with this die from Spellbinders and couldn't resist!
(Labels 54 Decorative Element & Labels 54) 
It's so pretty and I love the shape!

I used Heartfelt Creations flowers and papers, inked the edges
and Voila! A quick and easy card to make.
Shh don't tell my aunt she thinks I spent hours on it!! lol!

Right I'm off for a play with the NEW Classic Rose collection!
Have a great day!


Thursday, September 15, 2016

Relax ......


Thought I would share this card I made the other day for my friend!
I know I have been missing from here and I'm sorry!
I am working on getting some posts up! 

Of course I made this with Heartfelt Creations papers, stamps and dies!
It's an eclectic mix as there are a few collections here! 

I was sorting through my papers the other day and I just had to 
use this card front from the Celebrate the Journey paper pad.
I had no idea what else I was going to do just I wanted to use the paper!
Lol ever have that happen too? I bet there are lots of you that do! 

Lol A few years ago everything I made was pink and there was no blue!
I just looked up at my shelf of recent makes and thy are all blues!!!
Lol I have a pink one to share next but I have to wait until I have given my Aunt her card!
Soon I promise!

Hope you are having lots of crafty fun!
I have been drooling over the next few releases from Heartfelt Creations
Oooh and there is .......... oops I nearly said! lol!
Let's just say you won't be disappointed! 
Hugsxxx


Friday, September 09, 2016

Shoes and a shoe box!


Oh my goodness I am so excited to share this project with you!
I just had the urge to create a pair of shoes!
And then I thought .......... Mmm they need a box too! lol!


I had such fun making these I really hope you LOVE them too!


Of course I had to decorate the back too! 

Oh how I would LOVE a real pair of these.... Jimmy ........ lol! 

Here is a close up of the corner of the shoe box.
 I just decorated the one corner as it was designed for the shoes to sit on it!


The lid is all glittered on each butterfly, the camera didn't pick it up very well .....
Also all the flowers and leaves are sprayed with Irridescent Spray and Sparkle! 

I made the shoes and the shoe box with the Sara Signature English Country Garden 
collection from Crafter's Companion.

Here are the items I used:
12 x 12 paper pad
Beautiful Leaves stamp set
Lazy Daisy die
Floral Vine die
Grand Floral metal die

Die'sire Mixed Media Gift Tags die set

Other items: Prills (flower centres) pearls, glitter glue, Peeled paint and Victorian Velvet Distress Inks
I used a shoe template I found on Pinterest for the shoes, search shoe template and you will find it easily!

Happy Crafting everyone! Hugsxxx

Wednesday, August 31, 2016

Snowmen fun!


It's Heartfelt Wednesday! Here is the card I made this week.
I had fun making a snowy scene and making an acetate card!
The idea was the inner of the card completed the picture of the front 
of the card as you can see though it!

These snowmen are such fun to colour and so easy too!
I love easy colouring lol!!!!! 

Here is the inner! 


The card wasn't  easy to photograph so apologies!
Lol it seemed odd taking snowmen pics in the blazing sunshine!!!!

To make the card I used the following:

HCD1-709  Gift Box and Mini Snowflakes Die
HCD1-7107 Frolicking Frosty and Spruce die
HCPC-3750 Frolicking Frosty Cling Stamp
HCPC-3751 Snow Kissed Flakes and Tag cling stamp set
HCPC-3749 Snow Kissed Spruce Cling stamp set
TSMP602 Teal Zeal Memento Ink Pad
159723 Dries Clear Glue
85-glitter Transparent glitter
241159 Dove Blender kit

Other Products Used : White card, Dotty Embossing folder, Acetate, Snowflake Paste,
Peeled Paint Distress ink, glitter glue, Promarkers (Ivory, Tan, Cinamon) Spectrum Noir
Markers (IG3, OR1 and True Black), 3D Foam pads, 3D glue. 
Spellbinders Lacey Oval and Oval dies.

Fold a piece of acetate in half. (I used an A4 size with white dots on) Tear several
pieces of white card and emboss with a dotty embossing folder. Arrange the card to
look like snowy hills and adhere to the card with glue and 3D foam pads. I did this on all 
sides to cover the glue marks as you can see them through the acetate. Stamp and die cut the 
trees and snowmen. Use the snowflake paste on the trees and sprinkle glitter over it. 
Using glitter glue, glitter the snowmen. Colour the snowmen with the Dover blender pen and 
the Teal Zeal ink. Colour the boots of the snowman with marker pens. 
(I used Promarkers - Ivory, Tan and Cinamon) Colour the nose with Spectrum Noir OR1 and the buttons with True Black. Shade the snowman with a grey I used IG3. Stamp, die cut and glitter the snowflakes. Die cut the lacey ovals die and colour with Teal Zeal ink. Die cut the oval die and adhere to the lacey oval die cut. Adhere to the inner of the card. Adhere the trees, snowmen and snowflakes to the card and your project is complete.