Monday, December 25, 2017

Happy Christmas


Wishing you all a very Happy Christmas.
Hope you have a lovely day whatever it is you are doing.

Thank you all so much for all your lovely comments this year,
they really do mean so much. It's been a woderful year getting
to know you all and having crafty fun together!

Lots of love and hugs to you all xxx 

Wednesday, December 20, 2017

O' Christmas Tree


Have you got all of your Christmas cards made now?
I think this image of the little girl looking at the tree is
my favourite image this year from the paper pads.

I have a feeling my little girl will be getting this
as she loves to lie on the floor all wrapped up in a blanket
watching the tree for ages! She says it's magical! Aww bless her.

Bless we went to see Santa last night, Isabella went so quiet! It's a first lol!
It's such a busy time of year as it's her birthday Christmas Eve too.
We try every year to be organised........... Mmm yeah! lol!

Happy crafting everyone! Havea great day.


Monday, December 18, 2017

Winter Wonderland


Printed papers and card fronts from the paper pads make for
super EZ last minute Christmas cards!

I have layered a 6" x 6" paper piece and a card front ontop of each other
with white card. Added a few flowers, trees and a sentiment!
As I have a stash of flowers I made with the new molds this card took me
20 mins tops to make! And of course I glitterd the snowy areas on the card too! 
Lol you know I love my glitter!!! 

I am planning on making a stash of these trees from the Snow Kissed collection
ready for next Christmas! I love having ready made embelishments
you can just pick from! Bit like having a sweetie shop in the craft room!

Have lots of crafty fun everyone! 

Sunday, December 10, 2017

Deck the Halls!


A quick post from me today!

The hardest and longest part of making this card was choosing my papers! lol!
Although it was pretty easy as they all come from the Winter's Eve paper pad
and are deigned to go together!!!!!

I am loving playing with pinks and blues for Christmas!

I just wanted to thank you all for your support after my FB live yesterday!
Wow just shows anything can happen!
I am pleased to say my daughter is ok and alls well.
Thank you for all your love and understanding, it wasn't quite how I planned!

Happy crafting everyone! 

Saturday, December 09, 2017

EZ Christmas cards & Flowers!


Christmas is getting closer! Wow it's not far now!
Have you got all your cards made? Shh I haven't but I am working on them!
Join me  LIVE over on the Heartfelt Creations Facebook page HERE
as I show you some quick and EZ ideas for your cards that you can make in 30 mins or less!
Even faster if you make all your flowers first!


The card fronts from the Paper Pad collections make
it so easy to make these quick cards!


Here is a quick tutorial showing you how I made my flowers 
with the new Poinsttia Flower shaping mold. 
WOW I love this tool! 
 Have fun! 


Step 1: Stamp the Poinsettia & Holly Cluster stamps. 
TOP TIP: Stamp them all on one sheet so they can be die cut in one pass. 
A great time saver! Plus if you have a large arcrylic block
you can stamp both the flowers at once and then th leaves at once too!


Step 2: Die cut the flowers and leaves using the Poinsettia & Holly Cluster Die.
TOP TIP: Run them all through at once as they are stamped on one sheet!
Place them into the mold, lightly spritz and then run through your die cutting machine.


Step 3: Tip the all of flowers and leaves out of the mold.


And then press the centres down with a flower shaping tool and glue two flowers
 together and place ontop of a holly leaf. 


TOP TIP: Add a dab of glue to the holly centre, place a flower on andadd another dab of glue to
the flower cenrte and then place the top flower on nd then press down in the centre. Its a time saver!


Step 4: Adhere prills to the flower centres.
You could also use stamens, if so use the piercing mat and tool from the 
Deluxe Flower Shaping Kit to make a hole and add your stamen of choice.


Step 5: Using a sponge dab glue on the edges of the petals and cover with
Frosting Powder for a super effect!


WOW I made this many flowers in just two hours!
Such an EZ way to make flowers ready for your Christmas projects!

Here is what I used on these projects:

Friday, December 01, 2017

Because I Care.


Talk about getting ahead in my cardmaking!
This is for my anniversary next year! lol in August!!!
I was so inspired by Ellen Millers card that I just had to have a go.
Here is Ellen's card below click HERE to see how she made it.

You know I LOVE my shaped cards!
This would make a fabulous Valentines, wedding card or even wedding stationary!
With a photo in it sure makes for a piece of home decor as well!

I used the Heartfelt Love collection to make my card, you can find it HERE
Happ crafting everyone!

Wednesday, November 29, 2017

Winter Wonderland


I took myself in a toally different direction with this card
than where I first started from! As it developed I decided 
who was going to recieve this card and it just took off!
Lol there is lots of Crystal Clear powder on this it sure does sparkle!

Sometimes making a project that is outside of your comfort zone is
just what the crafty fairy ordered as it stretched your imagination!
Have lots of crafty fun!

I used the Winters Eve Paper pad alongside the Woodsy Wonderland and 
Snow Kissed collections on this shadowbox card! 


Monday, November 27, 2017

Shadowbox card


I thought I would use up the spare poinsettias I had left on my desk!
Which in turn led to me get out the Sparkling Poinsettia papers........
Yes I fell in love all over again! lol How could I have left these papers in the box! lol!

I have used a shadowbox card on the front of a 6" x 6" card.
They give great dimension to your projects!

Have lots of crafty fun!

Saturday, November 25, 2017

Merry Christmas


I've been playing with black as a backdrop to my cards!
I was inspired by my friend and teamie Gloria Stengel's projects and this is
what I came up with using the Winter's Eve collection.
I love how the black makes the pink pop!

I'm not sure my tree will look as beautiful as this one in 
the image, but we will have fun putting it up later today!
 Have a fabulous day everyone!
Happy crafting


Monday, November 20, 2017

Snowflake Gift Boxes


Today I'm sharing two quick makes with you! Two gift boxes for Christmas. 
Wouldn't these also make gorgeous name place settings for your Christmas table?

They are both made in exactly the same way the only difference
is I added a handle to one and use velcro dots on the other to seal it shut!

To make this I used the following:


Saturday, November 18, 2017

Christmas Lantern Tutorial


I was LIVE on Heartfelt Creations today with EZ alternative ways
to use the Gift of Love Box Die! Here is one of them
and a step by step tutorial for you. Watch me LIVE HERE


Also see how I make these beautiful poinsettia flowers!

As soon as I saw this die I just knew I had to make a Christmas Lantern!
Here I show you how to make it with 4 sides, but check out my live
as I have a larger one that I made as well!

Directions:


Step 1: Using black card die cut four of the box sides.


Step 2: Die cut the centre piece on all four sides and then fold along all
of the score lines and adhere the sides together. 
TIP: Glue the square part first and then the top pieces, it goes together easily.


Step 3: Adhere the base together.


Step 4: Using 3D silver stamp paint apply to the box to create
a metallic look. Apply from the left to right along each section using 
a motion sweeping across the box. Cut a strip of card 7 1/2" x 3/4" and
use the stamp paint on this also. This is the handle.
Using brads and a hole punch attach the handle to the box.


Step 5: Using Dries White glue and Frosting Powder create a snowy effect
over the box and handle and leave to dry.


Step 6: Decorate with the Sparkling Poinsettia flowers and add
a battery candle inside.

Happy Crafting everyone! 

To make the lantern I used the following:

Thursday, November 16, 2017

Poinsettia Tag Gift Box


Thought I'd share a tag gift box I made! It really is so quick and EZ to make.
It's perfect for giving that small precious gift for Christmas but is so versatile
you can use it for any occasion, just change up the flowers for decoration!
I just wanted to give you the heads up that the stamps and dies
to make this are only available until Dec 2nd so don't miss out! 


I have a few people I am giving money to this Christmas and
this tag box is just perfect for this!
Lol I might even hide in on our tree too!

Have lots of crafty fun.

To make this I used the following:


Wednesday, November 08, 2017

Just For You Gift Box


It's new release day here at Heartfelt Creations! 
Make sure you take a look at the blog HERE as we debut the Heartfelt Love collection


I had fun making a gift box with this collection!
So quick and EZ to make!


The flowers I used are the Botanical Rose.
I just love making them in blue! I know I often use pink
so it's a little different for me! 

I am going to be working with this die for a Facebook live on the 18th November.
I have some fun alternative ways for projects so don't miss it!

Have great fun crafting!


Thursday, November 02, 2017

Merry Christmas


Create fun effects on your projects by placing the diecut back inside the cut piece of card!
Use clear card behind this and it would have looked like a laser cut!


Sorry I've been quiet I have been on a training course in Latvia!
Wow it was amazing, I was blessed to be able to spend time with
some amazing people and to see some amazing places!
Anyways thought I'd better do a post now I'm back lol!

Have fun making your Christmas cards, I still have a few to do!


Monday, October 23, 2017

Snowflake Christmas Decoration


A very quick and EZ Christmas decoration!
It would be fun to make these with the little ones!

To make this I cut 4 of the Snow Kissed Flakes and Tag Die
out of white card. Glue two together and then the other two together
so that you now have two snowflakes. Adhere Crystal Clear Powder
over the front of the snowflakes.

Adhere white ribbon to the back of one of the snowflakes and
then adhere the other snowflake over it so you now have your decoration.

To make the flowers see the tutorial HERE.
Adhere the flowers and sentiment to the front of the decoration.
On the back you could add a photo, the date or anything else!

Have lots of crafty fun! 


Saturday, October 21, 2017

Snowflake Shaker Card


As promised during my Facebook Live here is the tutorial
on hoe to make this fun snowflake shaker card!
If you missed the live you can watch it HERE.

I had such fun making different things with the Snow Kissed Flakes and Tag die set!
I will share some of the projects with you over the next few days!


So let's get started with this shaker card!


Step 1: Fold a piece of card so you have a 5" x 5" tent fold card and
using the outer snowflake die cut to make a card.
Make sure you cut inside the top of the flake for a folded edge.


Step 2: Fold the front of the card in half to make the base of an easel card.
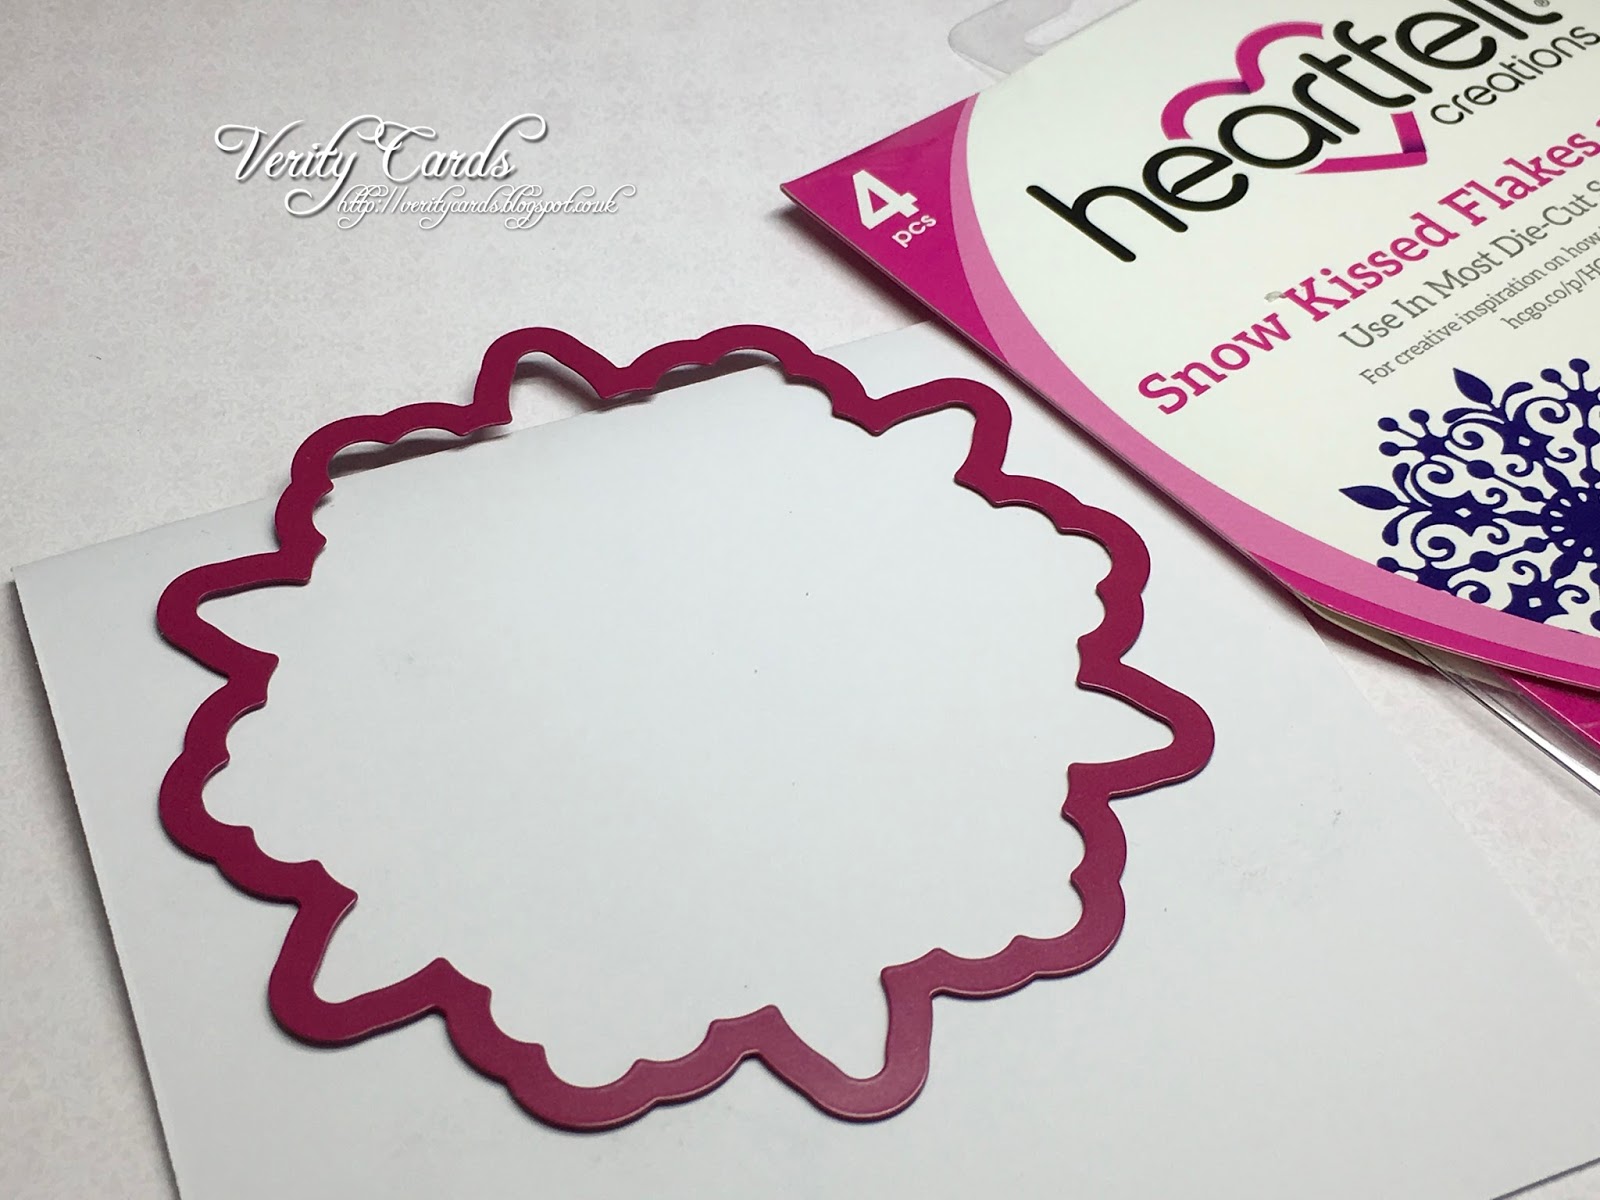
Die cut a single piece using the outer die also.


Step 3: Adhere the die cut to the folded piece of the easel card.
Die cut another from the Winter's Eve paper pad and adhere to the bottom
of the card. Also die cut a snowflake in white card using the inner die and adhere
to the base also.


Step 4: To make the front of the shaker card die cut the following:
1 x Snowflake in paper from the paper pad.
1 x Outer die using clear card.
1 x Frame using both dies together.


Step 5: Adhere the frame onto the acetate using dries clear glue
and a fine metal tip. Make sure not to get glue over the acetate.


Step 6: Snip the snowflake apart and adhere into the frame on your acetate.


Step 7: Adhere 3D foam pads around the edge of the front of the shaker. Make
it a double layer to give extra depth for your bits to shake well.
Cut the outer die using the papers for the paper pad so you have a scene
at the back of your shaker.


Step 8: Adhere the back to the acetate leaving a small section open
and add your bits to shake! I used prills and sequins in mine.
Adhere this to the easel card.


Step 9: Adhere flowers and a sentiment and you card is ready!
Have fun making some of these!

To make the flowers see this tutorial HERE

To make this project I used the following: